
From proof to print – sending the correct files to press
I sometimes have design clients ask me if the PDF proof that they’ve approved is OK for them to send to print.
Or a message asking me to remove the password from a file I’ve sent because it’s preventing their printer from sending the artwork to press.
Alarm bells ring for me because I know that if there’s a password on my file it’s because the file in question is a proof that I’ve sent, not a print-ready file (which wouldn’t usually be password protected). This is one of several reasons why I add password protection to proofs, as it can help catch a proof that’s been wrongly sent to press.
This article is intended to help you understand why you shouldn’t send a PDF proof to print and what needs doing before I can send a file that is suitable for print.

Illustration © Tom Holmes
Why can’t I just send the proof to print?
You may be happy with the layout of the design in the proof, and it looks great on-screen, so it’s reasonable to think that this file can be sent to print. However, there are a few details that make the file unsuitable for print.
Image quality
When I make a proof, the images are usually compressed and lower resolution than suitable for print, to keep the file at a small size so that it’s e-mailable. The images may look good at screen resolution, but would likely be blurry or pixellated if printed out.
Colour mode
I usually send design layout proofs in RGB colour mode so that they look their best for viewing on a computer screen. If you send an RGB file to a CMYK press the colours will come out incorrectly.
Print spec
The printer will usually have a print spec specifying a particular PDF format and details on how they like the file to be set up. A proof won’t have been set up this way as it’s not intended for print.
How can I tell the difference?
As proof and print files are both PDF files, I have a system for labelling them to help tell them apart.
Generally, I number proof versions with a numbering system – for example Filename_v1.pdf. I label print files with the letter P – for example Filename_P.pdf.
So, what is the correct proofing, sign-off and print file creation process?
This flowchart illustrates the correct process – once you’re happy with the latest version of the design proof you should send me written confirmation (an email is fine) advising me that you are happy with the design. I will then set up the final print file and send that over to you for you to forward to your printer of choice.
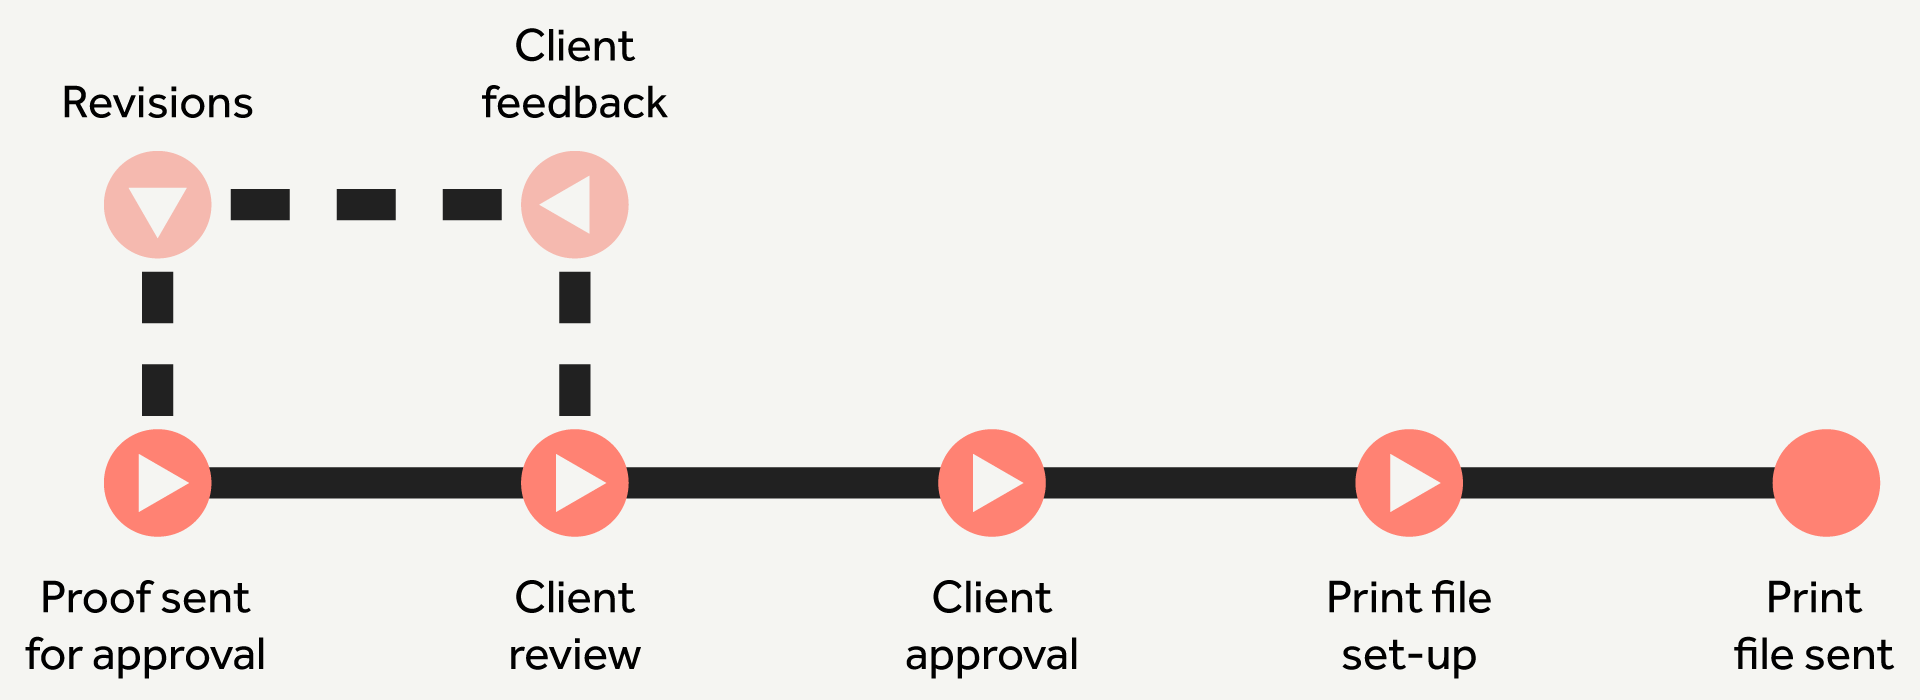
Illustration © Tom Holmes
(A flowchart of the entire design process from start to completion is also shown in my ‘Working Together’ PDF, sent to all new clients).
What’s involved in setting up the final print file?
Once the proof is approved, I then need to do a few checks and output the file for print. These examples are based on setting up and outputting from an Adobe Indesign file. It doesn’t matter too much if whether or not you understand all of these details, what’s important is that you’re aware that a few things need to be done before the file is ready for print.
Obtaining instructions from the printer
Before I do anything I will ask you to provide instructions from your printer as to how they would like the file set up. They’ll often have a pre-prepared spec sheet or template that they can email, or that is available on their website.
Getting the file ready
Without going into too much detail, there are a few checks I need to make before I output the print file:
Checking that all of the images in the document are correctly linked, suitable for print and up to date
Checking that overprints are set up correctly, particularly black text on top of coloured backgrounds
Checking the ‘preflight’ panel for any errors such as over-set text or missing fonts
Making sure the document has ‘bleed’ (over-extending items at the edges of the pages to ensure that the print goes right up to the edges without any gaps)
Adding additional mark-ups such as fold lines, where applicable
Outputting the files for print
Once I’m happy with the file, I need to do a few things when outputting the print files, based on the spec provided by your printer.
Selecting the correct PDF format
Selecting whether or not to add crop marks (lines in the corners showing where the page should be cut out), or other printer’s marks
Selecting how many millimetres of bleed to include
Making sure items aren’t outside of the specified ‘safe zone’
Selecting the preferred ‘pagination’ – the order in which the pages are supplied
Selecting whether to output all the colours in CMYK or if there are Pantone spot colours too
‘Packaging’ the master files, so that the printer also has the master InDesign file, as well as any linked images and embedded fonts
Writing a note for the printers informing them of any particular details they need to be aware of or look out for
Sending the files
I will usually send the files using a file transfer service, as they will likely be too large to email (I like mailbigfile.com). This also gives me a record that the correct final print files have been downloaded by the recipient.
Getting proofs from your printer
The proofs I send to you are what I would describe as layout proofs – i.e. they are a proof of the size and position of elements on the page, not of the print quality. Once I’ve sent the files over, you should also be asking your printer for proofs too…
Printed proofs
If you require accurate proofing of colours and images then you should request that the printer provides you with a physically printed proof so that you can see exactly how everything will look on paper.
Printer’s layout proofs
At the very least, I recommend that you should get a layout proof from the printers so that you can check that the file they are going to output to print matches the proof that I sent to you and that you signed off. There is a danger that something may have gone wrong when they opened my print file – checking a file from them will give you security that everything looks correct and gives you something to fall back on if your print arrives and doesn’t look right.
Conclusions
Thank you for reading – hopefully this article has helped shed a bit more light on the proofing and pre-press process so that the correct files get sent to your printer and your print job turns out exactly how you expected it to. Please remember, don’t ever send the PDF proof to print!